Hello everyone! I know I’ve taken way more time off from writing my blog than I should have and I do apologize!
 In case you don’t know, I decided a couple of years ago to work on
finishing my Bachelor’s degree that I didn’t finish 30 some odd years ago. Fortunately, off and on over the course of the years, I would take a class or two here and there. Then, in 2010, I decided it was finally time to do this. No more excuses…so…here I am. I am now about three classes, or 9 credit hours, away from graduating with a BA in Interdisciplinary Studies, with a minor in marketing from the University of Central Florida (UCF) – Go Knights!
One of the marketing classes I took for my minor was called Digital Media Marketing. This class taught me a lot about the digital world we are now all a part of, like it or not. My professor stressed the importance to the young students in the class of creating a digital online profile through Facebook, Twitter, LinkedIn, Google+, and other social media platforms. She also taught us how to build a basic website and how to write and maintain a weekly blog on a subject that we found interesting. And this blog project began as a weekly assignment for this fabulous digital media marketing class. Now that you know why I started this blog, I would love to continue with it even though it is no longer required of me, so let’s get to it!
Cooking is something I love to do, so this blog is a perfect way for me to share my love and passion for cooking with friends…I hope you will enjoy my posts as much as I enjoy writing them, cooking for them, and photographing the food I prepare for them! The holidays are wonderful, hectic, and crazy at best and they bring thoughts of loved ones we’ve lost, particularly the ones we were closest to. My Gommie – my mother’s mother -
is one of those whom I miss terribly all the time, but particularly during the holidays! I can attribute my love for food and cooking mostly to her. I was so fortunate to have grown up with her in my home, and she did most of the cooking while I was growing up. I learned to cook a lot of wonderful dishes from Gommie, and I am so thankful to have had her wonderful food and companionship for so many years.
Since Gommie is sadly now gone, my mother, Dottie, and I enjoy cooking together whenever we are together…well, perhaps I should say we used to enjoy cooking together, as it seems these days I do most of the cooking and she hopefully enjoys eating what I cook for her! I learned so much about food and cooking from both Gommie and my mother, it’s amazing! I feel so incredibly blessed that between my mother and me, we have preserved some of the wonderful traditional foods that we both grew up eating. Things like Gommie’s fabulous Chocolate Pound Cake, her Thanksgiving and Christmas dressing – a break from traditional southern cornbread dressing – and her version of macaroni and cheese, to name just a few.
I also was very fortunate to have known and cooked alongside my husband, Randy’s Granny Roberts…now that lady knew how to cook good ole’southern comfort food! I learned to fry fish and make hushpuppies to go with them from her. I also learned how to make traditional cornbread in a cast iron skillet and bake it in the oven.
I also have cooked with Randy’s mother, Sara, over the 33 years we’ve been married, and she still bakes her locally famous pound cake on occasion, not only for the family, but also for people who call and want her pound cake for this occasion or that. I am happy to say that I have the recipe for this pound cake! She also told me how she makes her cornbread dressing and her macaroni and cheese, which my children still crave to this day!
As you can see, I don’t have a recipe or many pictures this post, but I promise that most of my posts will have both…I was just in a nostalgic and reminiscent mood today and wanted everyone to know a little about why I cook and why I love cooking so much. I have had four of the most wonderful cooks ever to learn from! This blog post is dedicated to Gommie (Elaine Holt), my Mom Dot Sutton, Granny Alice Roberts, and my mother-in-law, Sara Roberts Stevens…bon appetite to all of you beautiful and very special ladies, in Heaven, Hartford, Alabama, and Lake Mary, Florida! I love and cherish all of our times together, whether in the kitchen or simply sitting around
chatting…till next time…
I recently decided to take my cooking to a new level…hopefully to a higher, more refined level! Back in September, I enrolled in a series of four techniques cooking classes at a wonderful cooking school in Orlando called Truffles and Trifles. The proprietress is a delightful woman named Marci Arthur and she not only brings a wealth of knowledge and experience to her classes and students, but also some very interesting stories of her life experiences. Marci also offers many hints and tips for the kitchen and shares copious amounts of recipes with her followers on her website at trufflesandtrifles.com and her Facebook page. She is indeed a very generous woman! After completing the Techniques 1 class, Marci decided to offer a Techniques 2 class in October and November to those of us who had taken the first class. In the first class, there were nine students, and in this second class there are only five of us. We just completed our third of four classes this past Sunday afternoon. Marci always has fabulous recipes for her classes, but the highlight of Sunday’s class for me was learning to make homemade pasta! I suppose I have always been a bit intimidated by the process, not knowing how to even begin…no one in my family ever made homemade pasta to my knowledge, so I did not have the pleasure or experience of watching my mother or grandmother make it, therefore I’ve never tried to make it myself. Marci, with her vast experience and wisdom, showed us how to make pasta dough by using a food processor – as Marci would say, “Now how easy is that???” I always thought, and rightly so, that you had to knead it out by hand, mixing your flour, eggs, oil, and water just so until whatever the right consistency was supposed to be. Not knowing that because I had no one to consult is the reason I have never tried to make pasta before. No more! I now know what I need to know and all I need in my arsenal is a pasta roller! I have a beautiful Kitchen Aide mixer that I can buy a pasta attachment kit for, but before I invest (yes, invest is the appropriate word here as these kits run about $200) in this, I will first purchase a pasta roller that doesn’t cost quite as much. I want to be sure this is something I am willing to spend some time and energy on often enough to justify the cost of the attachment for the Kitchen Aid! Ok…so I know you’re dying to know how to make homemade pasta with a food processor! So, you take 2 cups of all purpose flour, 2 tablespoons of olive oil, and 2 large eggs, put them all in the bowl of the food processor and turn the machine on. Add a little bit of water at a time, letting the machine continue to run, until the dough forms a ball. This won’t take very long, so be prepared to stop the machine when the dough is all together on one side of the bowl. The reason I can’t tell you the exact amount of water to use is due to the atmospheric conditions present at the time you are mixing the pasta dough. The amount of water varies due to the humidity in your kitchen, as well as the temperature, and probably even the barometric pressure at the time. The amount of flour, oil, and eggs, however, are constant quantities. Cooking is a scientific process – I feel really smart…you know, like Einstein, or Tesla when I cook! Right! Once you have the pasta dough in a ball, remove it to a floured surface and gently press it out a little flatter, then fold over, press again, fold again…do this four times. Be careful to not use too much flour, although you will need some to avoid stickiness. After you’ve done this step, roll dough out with your hands into a rope, or snake (yuck!), then using a sharp knife, cut the rope into about 6-inch pieces and wrap all except for one piece up in plastic wrap. You can either leave it out if you will be using it all right away, or you can refrigerate or freeze the pieces you will not be using. With the reserved piece of dough, flatten it out a bit, then using a pasta roller on the widest setting, roll the dough through, lay it on the floured surface, fold it in half, roll it through the pasta roller again, repeating a total of four times. This is the kneading process for the dough. Beginning with the fifth time rolling your dough, turn the dial to the next narrowest setting each time you roll the dough through, until you have rolled it out using the narrowest possible setting. There is no need to fold the dough during this process. When finished rolling your dough, lay it out on your floured surface and allow it to rest for approximately five minutes before cutting into the shape you prefer. One of the main things to remember is that while you need flour in order to avoid having the dough become too sticky, you must take care to avoid using too much flour, which will cause the dough to become tough. Marci was right – once you learn to make homemade pasta, it will be very difficult to ever go back to using the pasta you purchase at the grocery store in a box or bag on the pasta aisle! Homemade pasta is so much better tasting, is fun to make, and you could even turn making pasta into a fun and productive event by having a pasta making party!
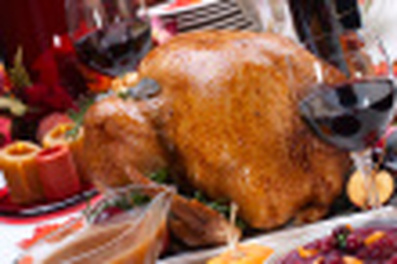
_ Wow! Thanksgiving is right around the corner…only three weeks away! Now is the time to begin your preparations and planning for what is likely your biggest meal of the year. I know, I know. three weeks seems like a really long time, doesn’t it? But…it will be here before you know it. You absolutely don’t want to be caught without doing at least some basic planning.
Trying to wing it for a big meal is no fun! I know because not too many years ago we were supposed to have gone to a relative’s for Thanksgiving, meaning that I was only responsible for bringing one, maybe two dishes…then with only a few days to go before Thanksgiving, I found out that our plans were cancelled and that it was going to be up to me to pull off a fabulous Thanksgiving feast for my family with virtually no time to prepare…I love to cook and entertain but only with ample time to prepare unless, of course, we are talking a much less important Family Event. The pressure was on.
_So…here are my suggestions for planning, organizing, and preparing for your Thanksgiving Dinner. And, no, I’m absolutely not talking about going out. To. A. Restaurant. Oh, the horror!
Ok, so get out your favorite pen and some paper – I prefer a spiral notebook so I won’t lose the pages. Think about the traditional foods that you and your family have had year-after-year and decide on which traditions you absolutely love and which ones you could perhaps eliminate or change somewhat.
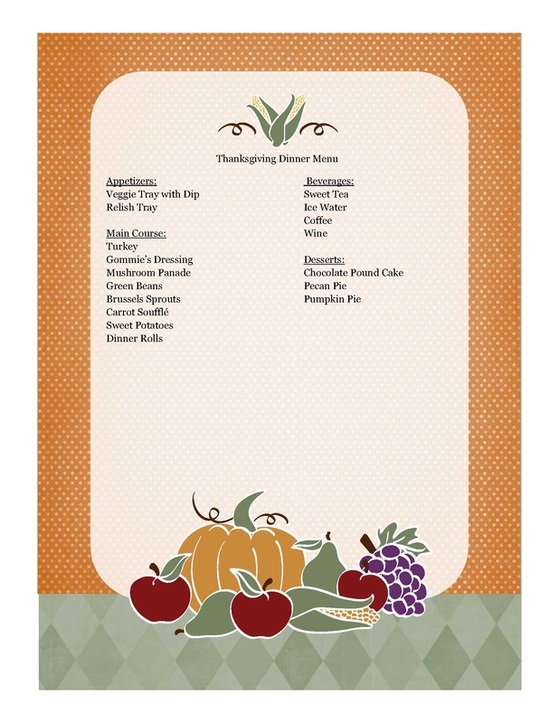
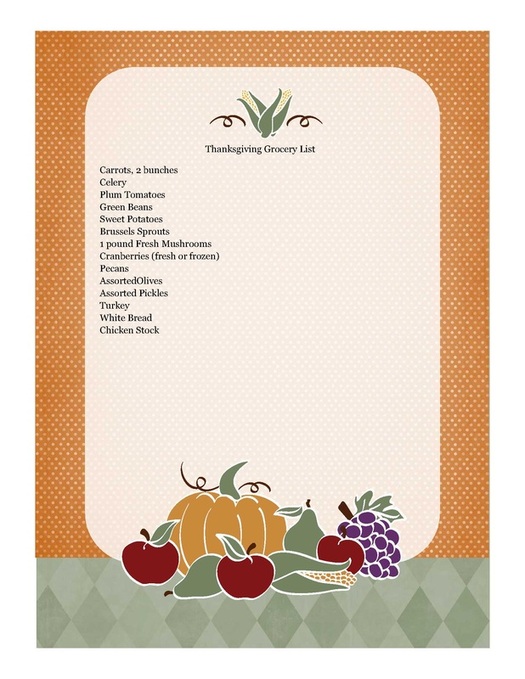
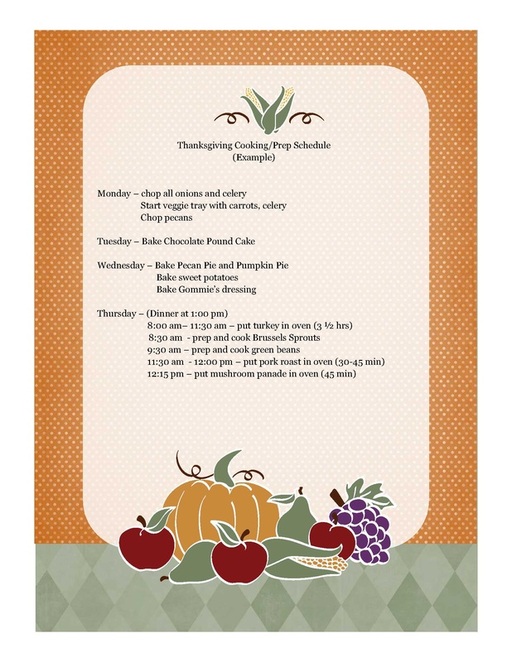
Write out your menu – starting with any appetizers that you will serve as your family and guests begin to arrive before the meal is ready to be served. The next item on your menu should be the meat or meats you plan to serve, their accompanying side dishes, and the bread you will serve. Next should be all the desserts you will serve. And last you should list out your beverages. _The next step is to begin to gather all of your recipes for your dinner and put them in your notebook with your menu. Once you have all of this together, it’s time to make your grocery list. Again, I use the same notebook so that everything is together. I begin to go through my pantry, spices, things in my refrigerator and freezer that I will need, then look at the recipes and put the items I am either low on or out of on the list. Since I begin this process several weeks out from when I will need them, the list is always changing.
This mega meal can also become a very expensive meal to prepare in terms of ingredients, so I also begin adding items from my Thanksgiving Dinner list to my weekly shopping lists so that I can buy the nonperishable items or frozen items early on and the fresh items in the days leading up to Thanksgiving. This helps my budget out tremendously! _I hope these ideas will help you all be organized, prepared, and more relaxed this Thanksgiving! This year I will need all the lists more than usual because I will be preparing and cooking my dinner in not only a different kitchen, but in a different state! I will be going to West Virginia to visit my daughter Courtney and three of my beautiful grandchildren. Everyone will be there except my son, Hunter, and his fiancé, Megan…sadly, they were not able to get off work, but they will spend Christmas with us.
I’ll keep you posted on how my planning and prepping is going along the way and I will definitely do my blog the last weekend of November on this meal of all meals…until next time, Bon Appetite!
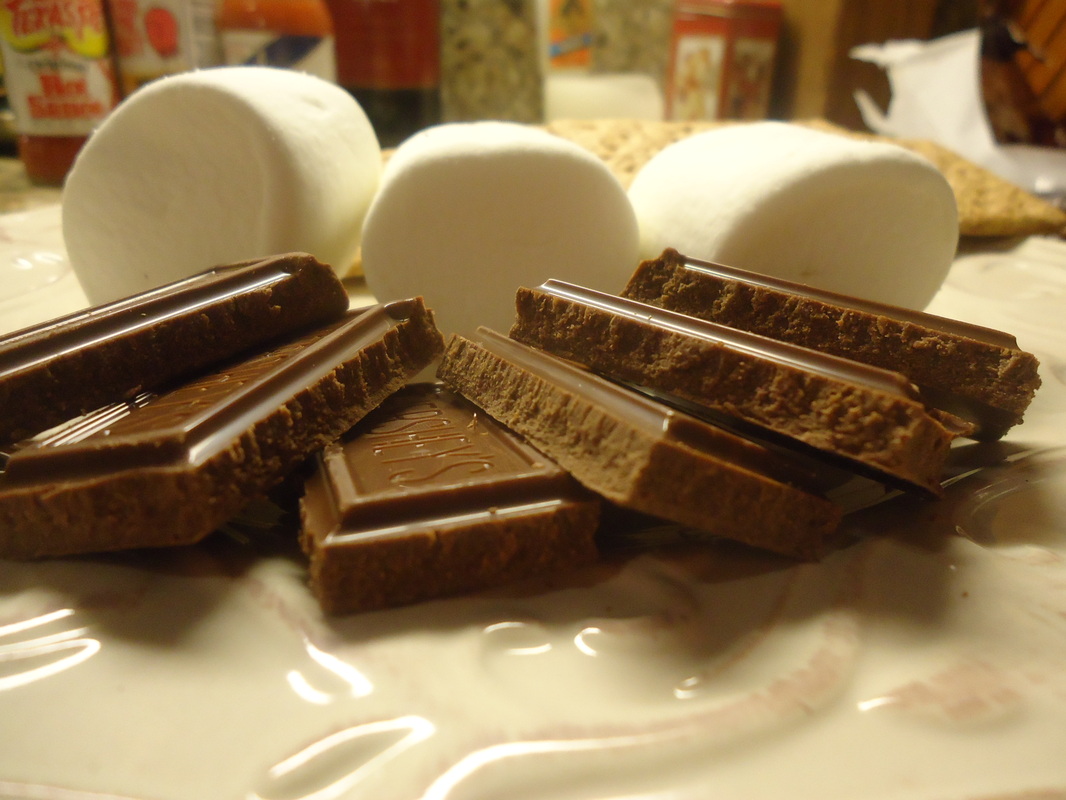
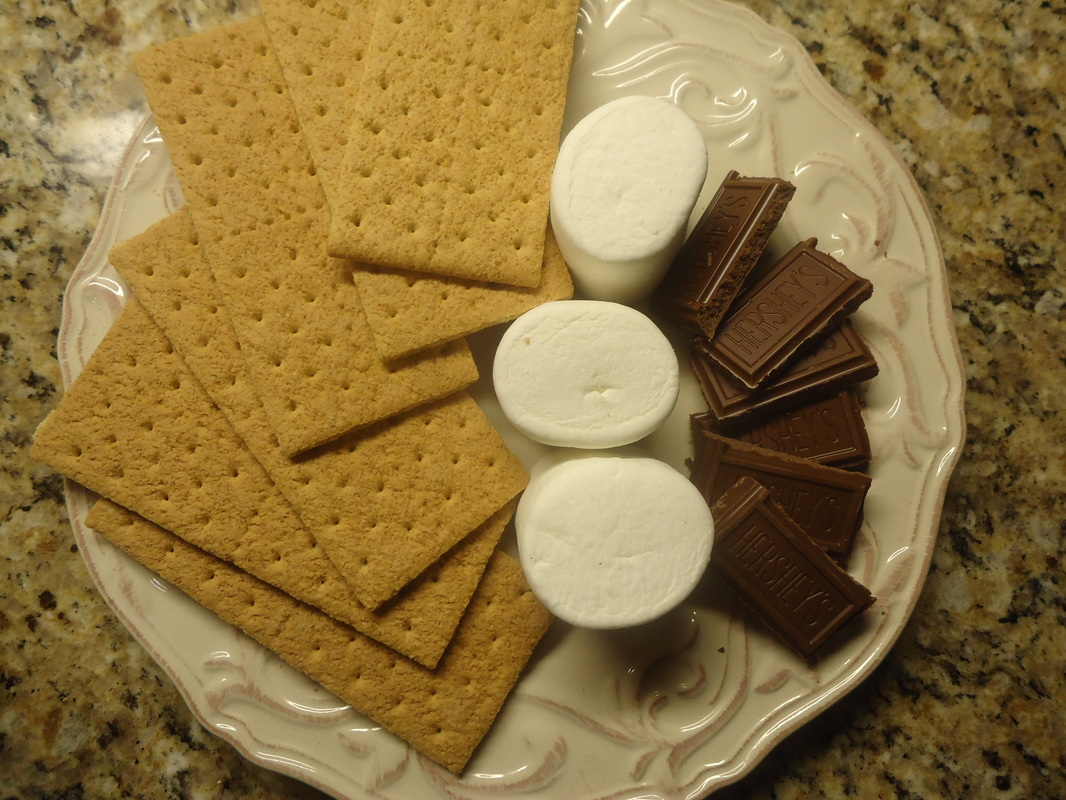
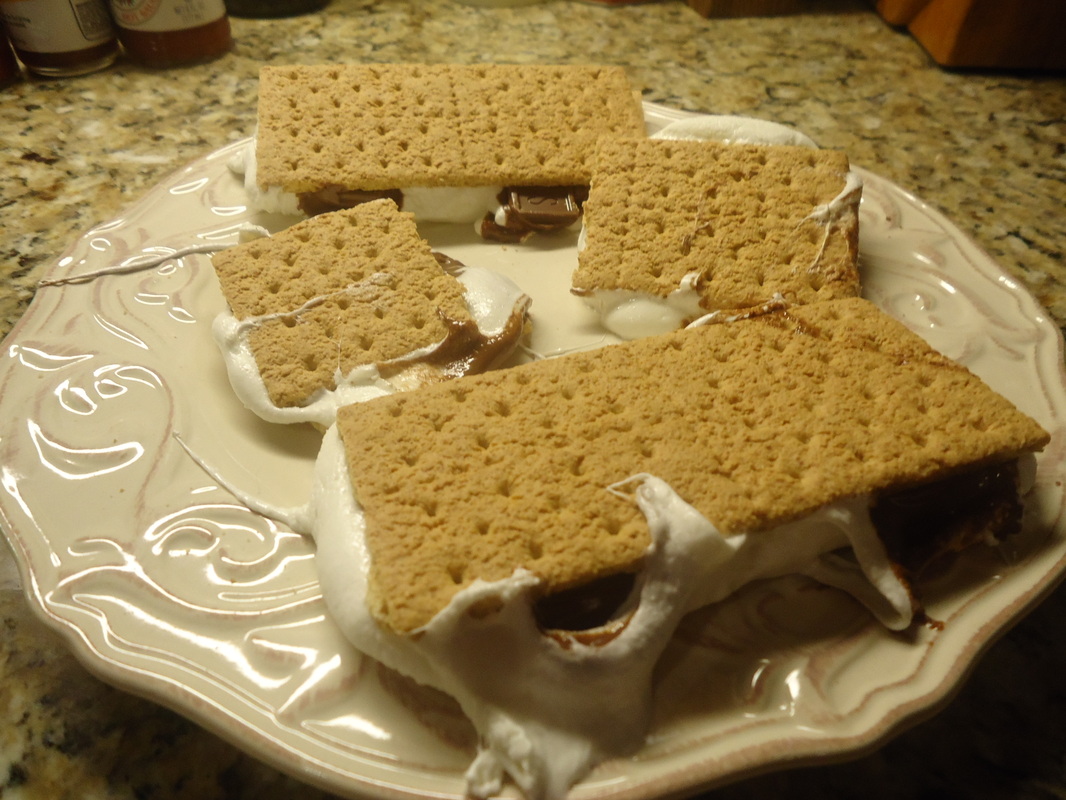
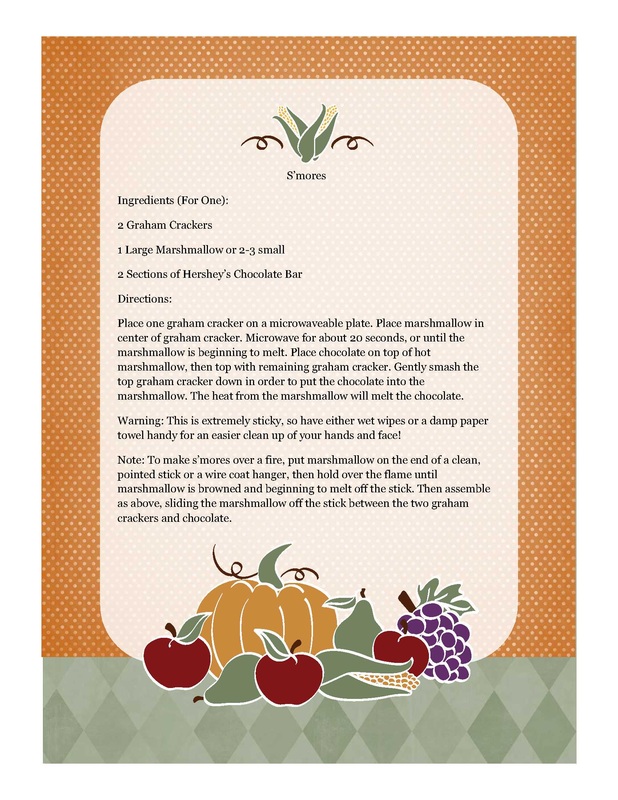
Friday night plus a temperature of 64 degrees in Central Florida, equals sitting around out on our patio, building a fire in the fire pit and, yes, even making s’mores! This is what we did on Friday night. Tori thought with the cooler temperature it would be fun to introduce Connor to s’mores…so that’s exactly what we did.  Tori enjoying her s'mores! It was a beautiful, clear night and since we just bought a brand new fire pit a couple of weeks ago and it hadn’t been used yet, the timing was perfect. 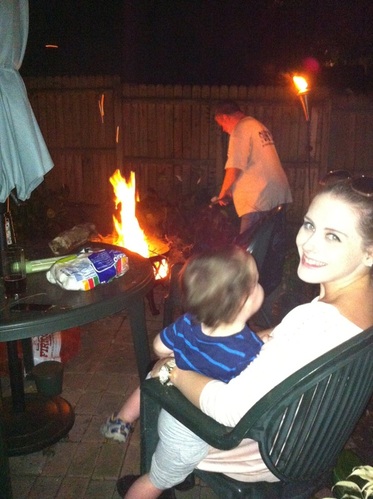 Tori & Connor with Randy tending to the fire We had those really big marshmallows, some graham crackers and a huge Hershey’s chocolate bar that we broke into small pieces for our s’mores. Our biggest challenge of the night wasn’t keeping Connor away from the fire as we had feared…it was finding some wire coat hangers to use for roasting our marshmallows!
I went on a search for wire hangers in the laundry room, and discovered that we do still have a few of the wire relics hanging around. I really don’t care for wire hangers, so I’ve been phasing them out for years, but for some reason, I must have hung on to a few of them for their most useful purpose of all!
Although Randy and I didn’t grow up together, we were both raised in Central Florida. We both have many fond memories from our childhoods of times spent around a campfire or a bonfire roasting marshmallows and making s’mores…we also carried on that tradition with our children as they were growing up. I remember a few times we would build a fire in our fireplace so the kids could roast marshmallows! Yes, we have a fireplace in our home…that was actually a requirement for us before we would even consider a home to purchase. We live in Central Florida, we don’t have a swimming pool, but we do have a fireplace. We have our priorities.
 Randy with his s'mores So…it is time to start teaching the next generation of our grandchildren the joys and pleasures of roasting marshmallows and making and eating s’mores. Connor loved it! Actually, we all did…it is something we will do more than once over the next few months when the weather is cool enough for us to sit outside and enjoy a fire. 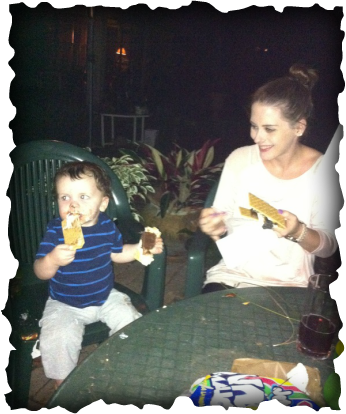 Connor eating his first s'mores! Ok…so you’re probably wondering about the after effects of the s’mores, aren’t you? With a toddler…well, shall I say that sticky was the word of the night? Oh. My. Goodness. What a sticky mess all of our hands were! But Connor took the cake, as the saying goes. He has chocolate and marshmallow stickiness on his face from on his little nose to down under his chin – sort of like a really gooey, sticky beard! His hands and forearms were similarly gooey. Ditto for the arms of the chair he was sitting in.
After he had finished his s’mores, he got down from his chair and toddled off into the yard to play with his little lawn mower. Tori decided the best way to clean him up was a bath, so she took him inside and he left his mower in the middle of the path leading to the house from the patio. When Randy and I were ready to go inside a little while later, I picked up the mower to move it and got a handful of not only a transfer of Connor’s s’mores, but also whatever yard debris had transferred from what he had touched! Yuck!
Regardless of the residual mess and stickiness, the night was a huge success! I hope you all will be able to sit outside by your fire pits and reminisce about your childhood adventures with roasting marshmallows or hotdogs over an open fire…Bon appetite!
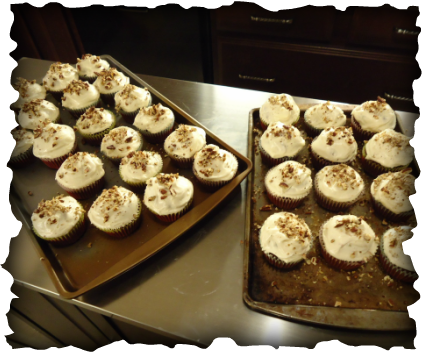
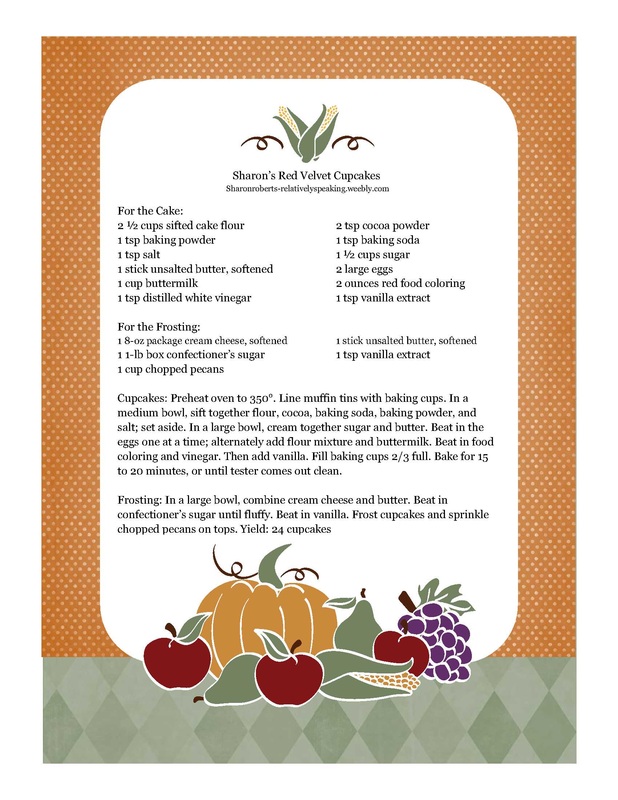
It’s Saturday and this is the one day of the week these days that I am able to fit in some cooking and baking. For those of you neophytes who have not had the good fortune to have tried red velvet cake, here is the ultimate in red velvet cake heaven! My daughter, Tori, and my son’s fiancée, Megan, both love red velvet cake but they have both told me that since eating my red velvet cake, they won’t eat anyone else’s. So today I decided to compare my recipe with another recipe I found on another food blogger’s site –http://www.thatskinnychickcanbake.com, who is Liz Berg. Her cake looks delicious and her icing sounds heavenly – white chocolate cream cheese icing; I use plain old cream cheese icing on mine…so let’s see what happened in Sharon’s kitchen today.
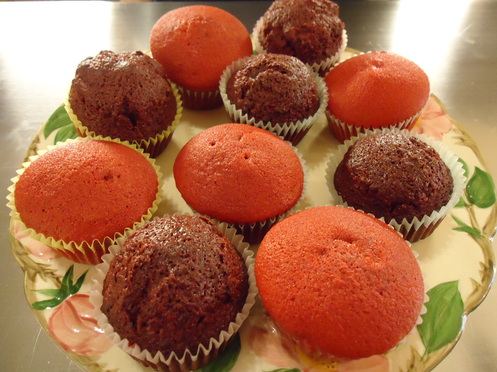 Sharon's are the lighter ones. Liz's are the darker ones. _I decided to make cupcakes for my comparison today, so I made my recipe first and after the cupcakes cooled completely, I frosted them with the cream cheese frosting I always use. Then I made Liz’s recipe. The first thing I noticed about Liz’s, as compared to mine, was that the batter was a lot wetter and soupier than mine. To make up for this extra wetness, Liz’s baked for about 40 minutes, while my cupcakes baked for about 20 minutes. I had my doubts at first, but hers did bake through and tested done just like mine. They also smelled fabulous while baking! After the cupcakes cooled, I frosted them with the heavenly sounding white chocolate cream cheese frosting from her recipe.
Then the taste test began – don’t you know this was the best part??? I think we all had a religious experience while tasting these two delectable recipes! I only wish that Megan could have been here for the tasting as well…next time, Meggie!
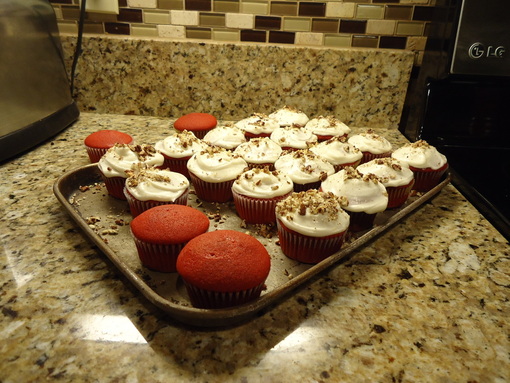 Almost ready for the taste test! _Now on to the results – after baking, cooling, and frosting both batches of red velvet cupcakes and then tasting them, Tori and Randy preferred my recipe over Liz’s. That being said, however, they loved Liz’s white chocolate cream cheese icing. Her red velvet recipe is a lot more chocolatey than mine…you can see this in the color of the finished cupcakes. They were delicious, but the preference here at my house were the ones I’ve been making for years. I will say that no one was opposed to me trying a new recipe…bring it on, they said!
So, for now, I will stick to my tried and true red velvet cake/cupcake recipe, but on occasion I may take it up a notch with Liz’s scrumptious white chocolate cream cheese frosting. Yum…we can hardly wait until the next batch is baked! Till next time…bon appetite!
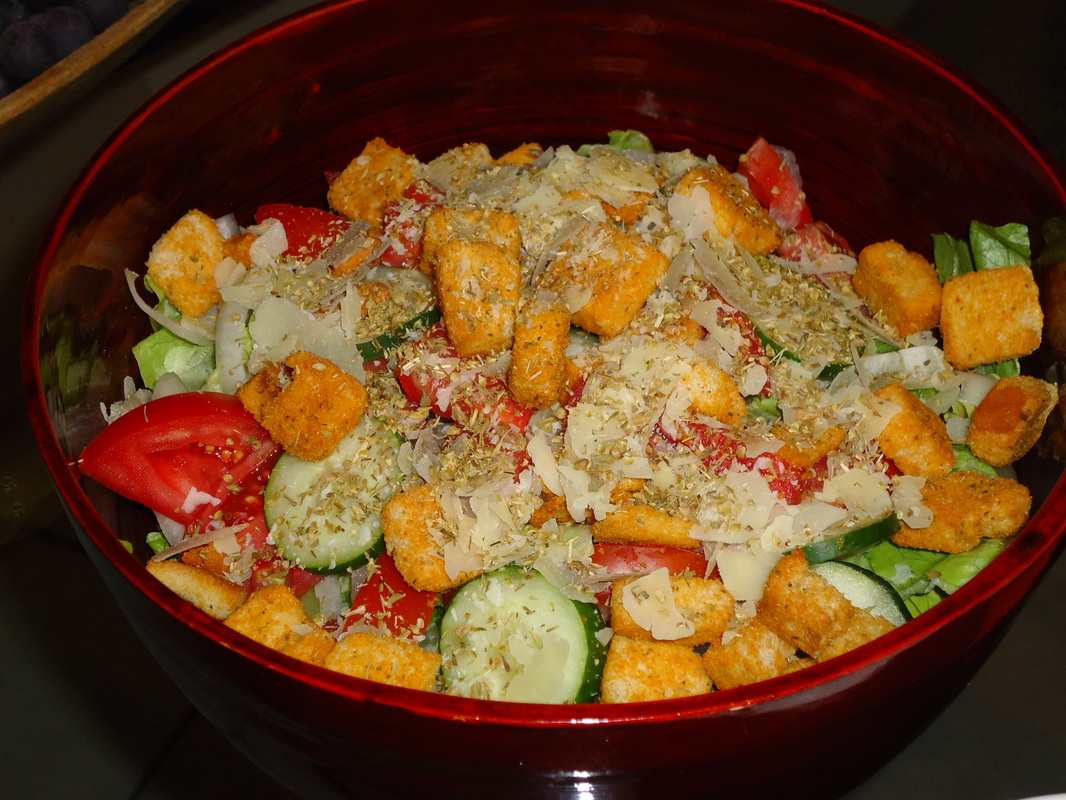
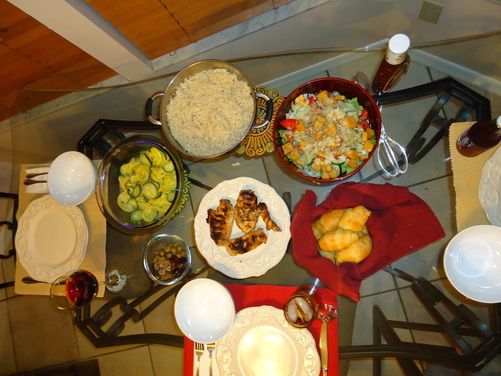
I don’t know about y’all, but I have been so busy lately that I’m finding it difficult to find the time to cook many meals for my family. We prefer to eat at home with a meal cooked by either me or my daughter than to eat out. That being said, with the hectic schedule of late, my beautiful and sweet daughter Tori cooked dinner for us tonight. Here’s what she fixed: A beautiful tossed salad with romaine lettuce, sliced cucumbers, tomatoes, onions, Parmesan cheese, oregano, seasoned croutons, with an olive medley on the side, and a sun-dried tomato vinaigrette dressing.
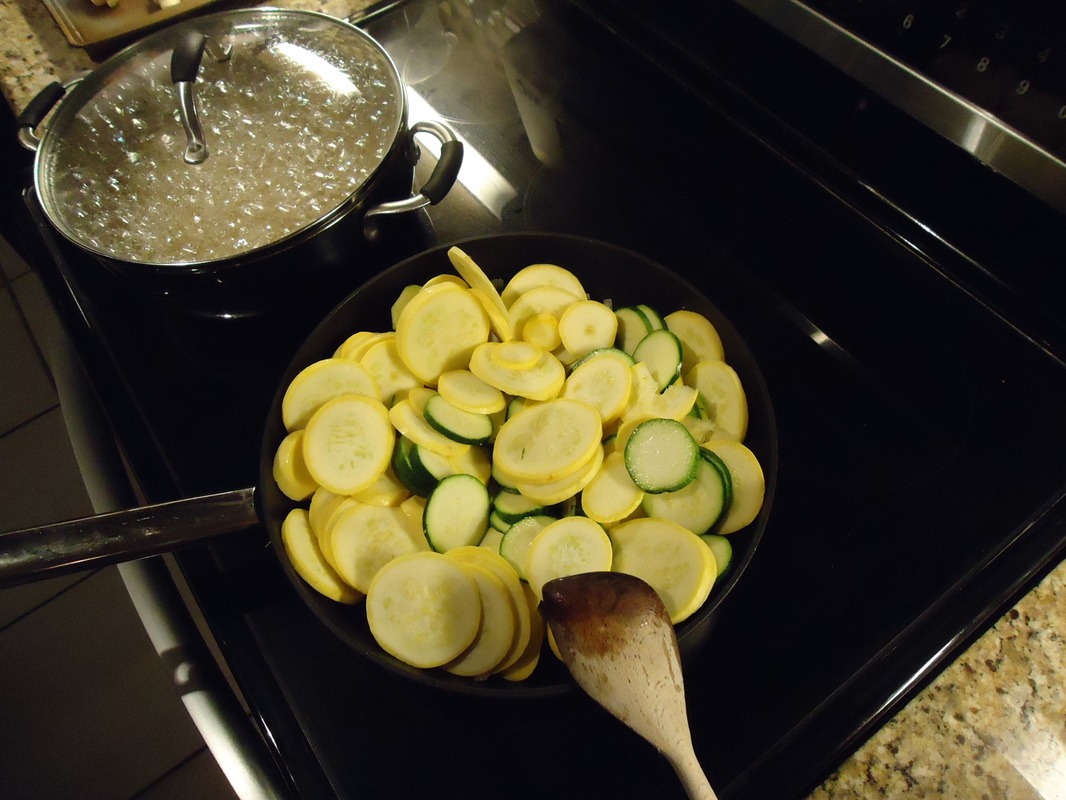
A vegetable medley of yellow summer squash and zucchini sauteed with butter and onions, salt and pepper.
Grilled chicken seasoned with a rub of oregano, garlic, and onion; and Pillsbury Crescent Rolls. She served good old Southern sweet tea, water, and a nice pinot noir wine (for me!) with the meal. I can attest to the fact that not only does it look delicious, but it also tasted as good, or better, than it looked!
What a nice thing to come home to, don’t you think? Tori takes good care of her mom and dad and she is also very considerate, taking the cooking off of me tonight after I worked all day, then had a lot of reading and writing (this blog!) to do this evening. She did all this and took care of her little boy, Connor all day…and cleaned my kitchen! Bon Appétit!
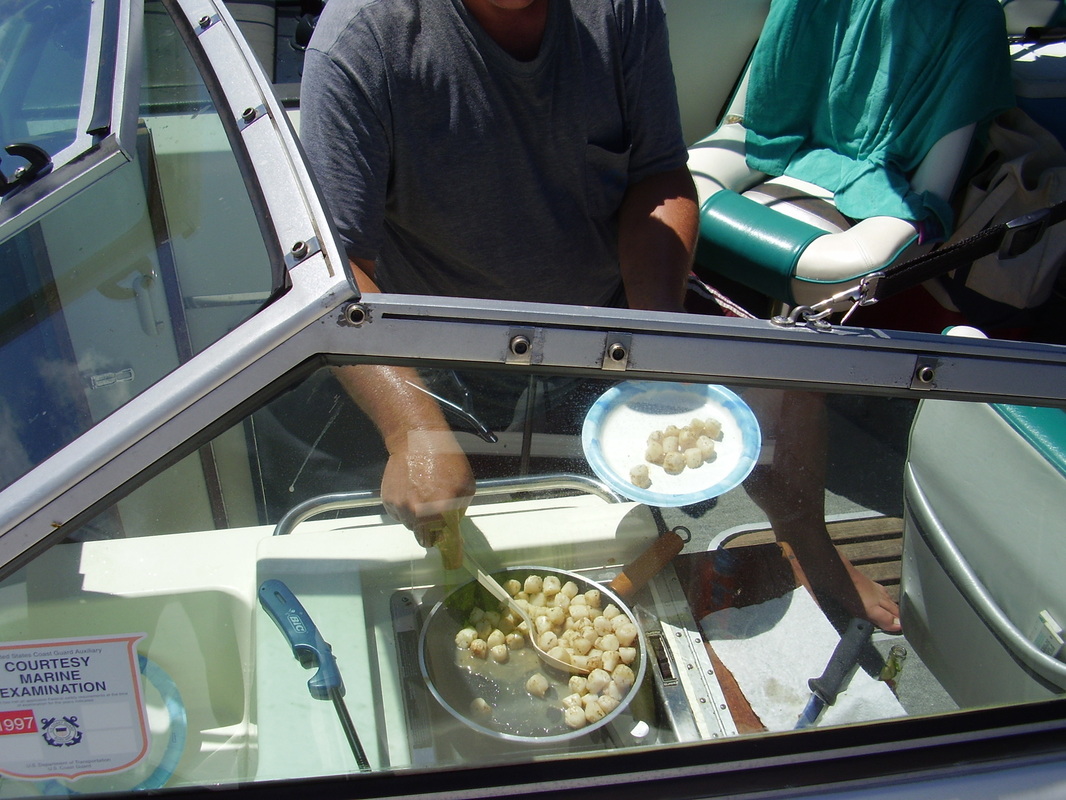
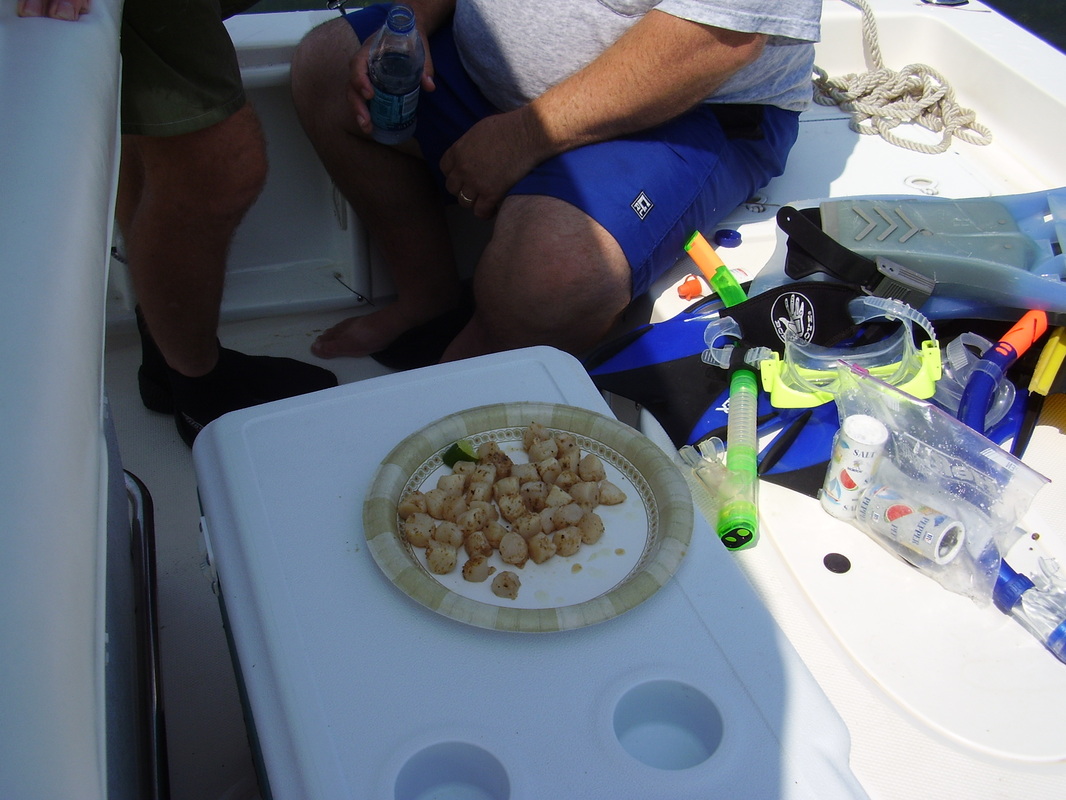
I know last week I talked about wine pairings and it was probably a little boring to those of you who are not wine aficionados…so today I will discuss those lovely jewels from the sea – scallops. 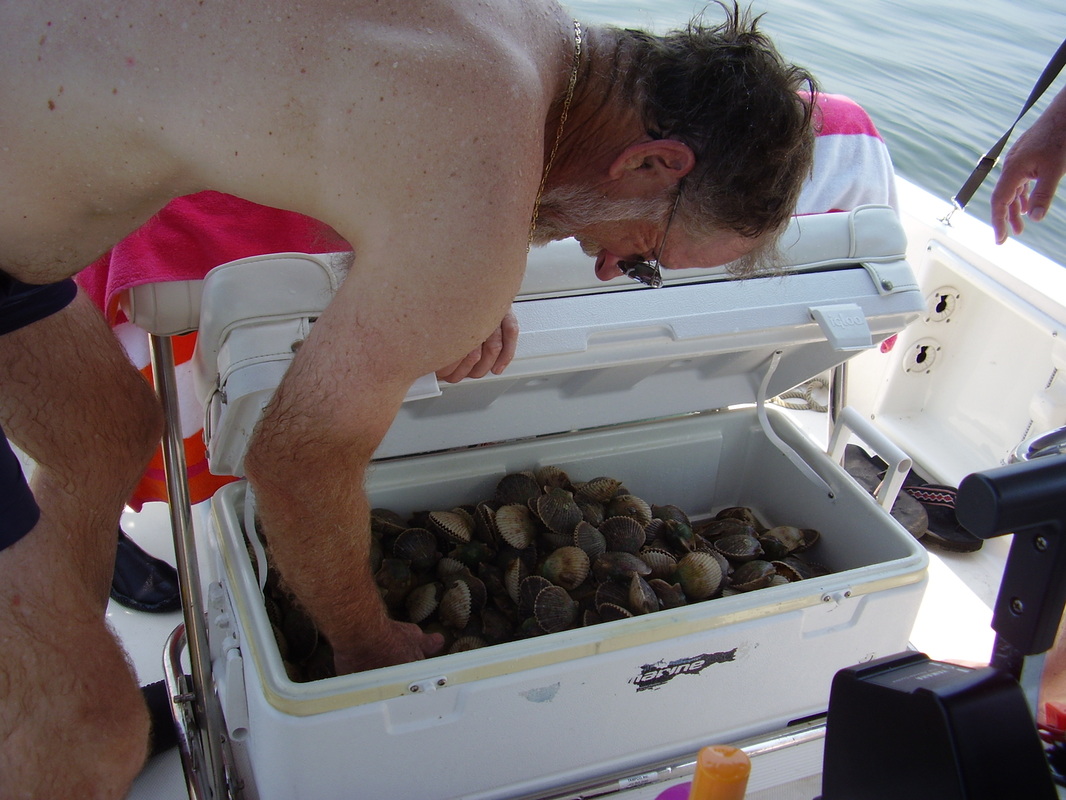 Our friend John with the scallops we caught My husband Randy & I and sometimes our daughter Tori, love to go over to Homosassa Springs on the west coast of Florida to go scalloping with a bunch of friends out in the Gulf of Mexico. Sadly, we haven’t been able to go for the past couple of years for one reason or another, but it is definitely on the list of things to do before too long. Well, we have to wait until summer when they are in season, but it will be here before we know it. The scallops we harvest from the gulf are closer in to shore as we snorkel to get them. These are little scallops and you need about four to six of these little ones to equal the size of a deep sea scallop. I typically sauté these small gulf scallops with a little herb butter, chopped red onions, and fresh spinach until it is wilted, and serve them over linguine. This is very simple, quick and oh, so delicious! 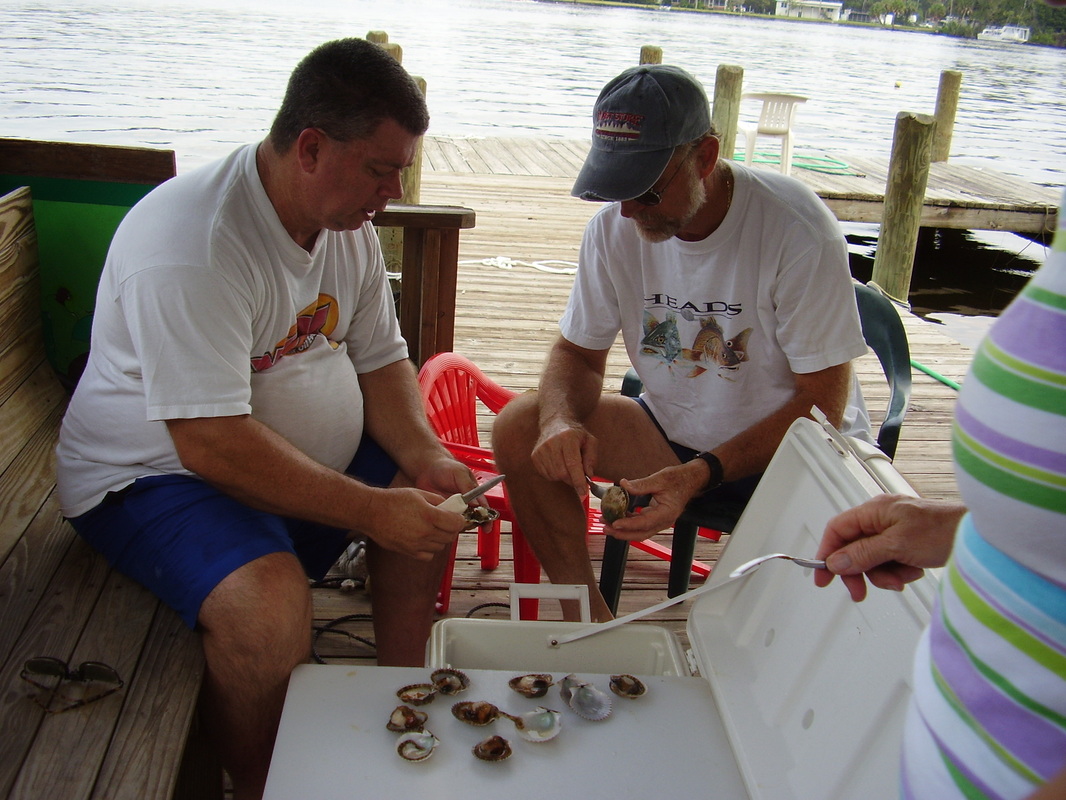 Randy and John cleaning scallops 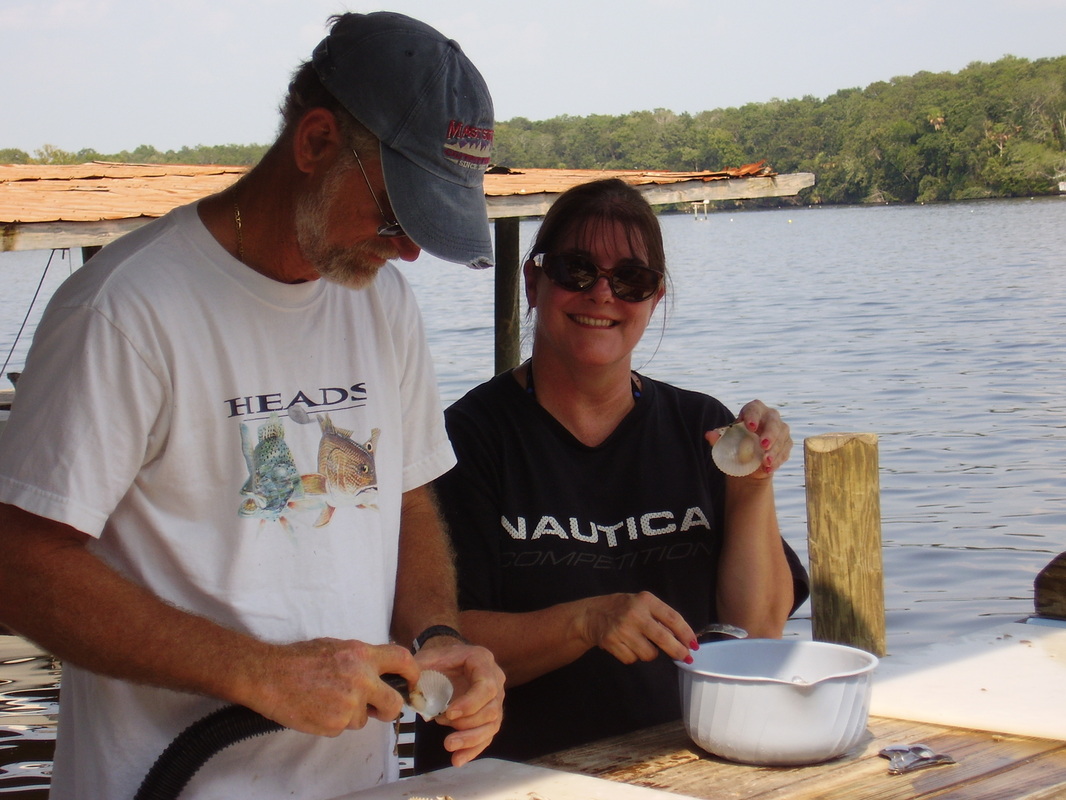 John and me cleaning scallops 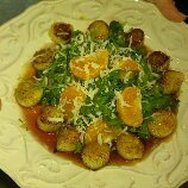 Seared scallops with arugula Seared scallops with arugula If you aren’t able to go scalloping yourself, or if you prefer the larger deep sea scallops, then you’ll need to buy them from your local seafood market or grocery store seafood department. I just have to say here, however, that you should be sure you are actually buying scallops by asking your market for the scallops with a piece of the mussel that attaches the scallop to their shell still attached. Don’t worry, the muscle is easy to pull off, but this ensures that you are actually buying scallops and not shark or ray wing – sadly, scallops are easily pirated and copied, and many people buy other meat at scallop prices when they think they are buying scallops, so buyer beware, matey! Also, if buying frozen scallops, be sure to read the label and never buy scallops if they are from China or Viet Nam…these countries are known for using other types meats and selling them as scallops.
Ok…enough of all that…on with the recipes – as a side note, I am having some minor technical difficulties this week, so I will have to post the recipes a little later…I promise they will be here soon, so please stop back in! I will post the recipes for herb butter and a yummy one for seared scallops with arugula salad and pomegranate gastrique (pictured, left)…trust me, they are worth the wait!
Scallops are especially good when paired with a beautiful, buttery chardonnay…enjoy, and Bon Appetit!
 If you are like me, wine is your beverage of choice with meals. I think a delicious and perfectly prepared meal is elevated to even greater heights with a perfect wine pairing. But do you sometimes wonder how to pair wines with foods? I sometimes do, so perhaps we can learn this together . According to Wine Spectator magazine, there are three important rules for wine and food pairings: - Drink and Eat What You Like – you should always choose a wine that you would drink by itself when pairing with food.
- Look for Balance – balance between the weight, or richness, of both the food you are eating and the wine you are drinking goes a long way to ensure that you enjoy the food and wine together. You don’t want to overwhelm the food with your wine choice and neither do you want the food to overwhelm the wine you are drinking. For food, you can determine weight by the fat – both what is in the food and what is in the cooking method or the sauce – and from wine, you can determine weight by the color, grape variety and alcohol level along with the winemaking techniques and climate of the region.
- Match the Wine to the Most Prominent Element in the Dish – this will help to fine-tune wine and food pairings. Usually the dominant character or element in the dish is the sauce, the seasonings, or the cooking method rather than the main ingredient.
The main take-away from this is that no matter what wine you pair with what dish, if you find the wine to be too heavy, you can always sip some water after sipping your wine before taking another bite of your food in order to prevent the wine from overpowering your dish. You can also take a bite of bread after your wine and before your next bite of food for the same result. If your food is heavier than your wine, again, you should drink either a sip of water or take a bite of bread before eating another bite of food or drinking another sip of wine. If you really want more specifics, take a look at the wine pairing chart below, do a little online research, and this should help in your choices. One of my favorite pairings is a nice Pinot Grigio with a sharp cheddar on an artisan herb cracker…talk about a little slice of heaven! Perfect! Cheers, and Bon Appétit!!!
 | wine__food_pairing_chart.pdf | | File Size: | 61 kb | | File Type: | pdf |
Download File
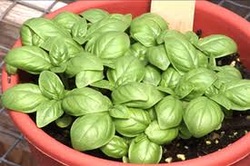 Basil in a container Basil in a container Did you know that growing your own fresh herbs is really quite easy and that it is very rewarding and satisfying as well? Fresh herbs also elevate flavors in your recipes far beyond what dried herbs do. Not a lot of space or time and attention are required to grow herbs either. So, what are you waiting for?
All you need in order to grow your own herbs are a couple of containers with drainage holes that are large enough for the herbs to spread or large enough to plant two or three herbs in one container, some potting soil, some sand (sandbox type is fine), and Styrofoam packing peanuts, rocks or broken bits of brick, or chunks of broken pottery or stoneware. Put the Styrofoam peanuts or other chunky stuff in the bottom third of the container, use the sand for the next third, and top it off with potting soil on the top third. Then you plant your herb(s) in the potting soil. Herbs don’t like really wet roots, so be sure not to over water them. The purpose of the sand and the bottom layer of your container is to aid in the drainage process to keep the roots from becoming too wet, but if it hasn’t been raining much and if the soil feels dry or the plants are looking a bit wilted, put a little water on them every now and then.
Growing herbs in containers allows even people living in small spaces like apartments to grow them. No matter what your space constraints are, just pot them and put them on the balcony, outside your front door, or outside your back door. You can even grow them in smaller pots on a windowsill. The main thing is to place so that they are convenient for you to get to. After all, the object of growing them is to use them! If you are growing them outside, you can pretty much let Mother Nature take care of them. If they are where Mother Nature can’t help much, water them when the soil is dry or if the plants are looking wilted.
Most herbs do just fine in whatever light conditions are available, but if they are in the direct Florida afternoon sun, this could be somewhat harsh for them. Filtered sunlight is best for herbs. The best thing you can do for your herbs is to use them once you plant them. Snipping off a few leaves or stalks to use in your recipes will promote healthy growth or thickening of the plant, which produces more foliage for you to use.
Ok…so now that you have your containers ready for planting and you know where you’re going to put them, what herbs should you plant? Some of my favorite herbs to grow and use are rosemary, basil, thyme, oregano, chives, dill, mint, cilantro, marjoram, and sage. You can plant some herbs together in the same pot, but be sure to go online and look which plants pair well together.
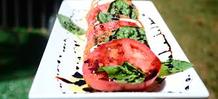 Caprese Salad Caprese Salad If you also love tomatoes, you can make a delectable caprese salad using basil from your herb garden. You’ll need 2 cups balsamic vinegar, 3 whole ripe tomatoes slicked thickly, 12 ounces mozzarella cheese sliced thickly, fresh basil leaves, olive oil for drizzling, and kosher salt and freshly ground black pepper. In a small saucepan, bring balsamic vinegar to a boil over medium-low heat and cook for 10 to 20 minutes, or until balsamic has reduced to a thicker glaze. Remove from heat and transfer to a bowl or cruet and allow it to cool. Arrange tomato and mozzarella slices on a platter and arrange basil leaves between the slices. Drizzle olive oil over the top of the salad, getting a little bit on each slice. Do the same with the balsamic reduction. End with a sprinkling of kosher salt and black pepper. Enjoy! Oh, and you can store any extra balsamic reduction in the fridge for a later use. Bon Appetite!
 Mom and me Mom and me
I have been cooking for a very long time now, and I have always enjoyed it. I especially love cooking for my family and friends, particularly in the past several years. I learned most of what I know about cooking from my Gommie (my mother’s mother), my mother, my mother-in-law, and one of my husband’s grannies. They were, or are, wonderful home cooks who learned from their mothers and grandmothers, so the cooking I have learned from them has been a tradition that has been passed down through several generations. I am now passing the knowledge I have down to my children.
As a child, I really didn’t have many opportunities to learn how to cook from Gommie or my mother. Since we had a really small kitchen and Gommie was picky about not having anyone in the kitchen while she was cooking and I don’t remember my mom doing much cooking, I would watch from just outside the kitchen. When I was about eleven, or so, we had moved to a larger house with a much larger kitchen. That’s when I was finally allowed to hang out in the kitchen while one of them was cooking.
My mother was also very patient with me when, on occasion I would announce that I was going to cook dinner that night. I would be confident in my abilities to a point, then I would begin to second guess myself and call her at work with questions like “what temperature do I put the oven on?” or “how do I know how much salt to add?” Each question, of course, was a separate phone call. As I got more into my teen years, I became too busy to spend time in the kitchen. Fortunately, by the time I was in college and still living at home, I was more interested in learning from them and I took advantage of their tutoring. When I married a few years later, I knew my way around a kitchen fairly well, but over the years my cooking has definitely evolved and improved.
In the early years of my marriage, I cooked passably well…some things were okay, some were really good, and some were utter and complete disasters. I did find out, however, that I did have a knack that I apparently inherited from Gommie and my mother – I could put things together and come up with a meal or a dish without a recipe, or I could take a recipe and modify it to suit my family’s preferences and it would turn out to be really good. In the past several years, or so, I have settled into what my husband calls my ‘Gourmet Stage’ of cooking. I am unafraid of trying recipes that have more than four ingredients or complicated instructions, and I try different techniques and methods. Fortunately, most dishes I have attempted have been successful.
 Marci Arthur Marci Arthur This all leads me to my latest cooking adventure…something I have dreamed of for about five years…I have enrolled in a techniques cooking class at Truffles and Triffles, a lovely cooking school located in the heart of Orlando in College Park. Marci Arthur is the owner and Chef who owns the school and teaches the classes, and she is a delightful, knowledgeable, and fun teacher. The class I’m taking began on Sunday, September 8th and runs each Sunday in September, ending on September 29th. Last week we made several pork dishes, asparagus with hollandaise, along with many other delectable dishes and sides. This week chicken was our focus, with a wonderful roasted chicken with cornbread stuffing, carrot soufflé, coq a vin, baked rice, and several other amazing entrees and sides! I highly recommend Truffles and Triffles to anyone who enjoys cooking, would love to learn more, or just wants to have a fun afternoon or evening among friends.
|
 RSS Feed